
Businesses with a digital presence need to send a large number of emails to their users, clients, vendors, etc. For this, you need an email service or email API service to deliver emails. Email services are hosted by large cloud service providers that offer a convenient way to send emails.
These email services have their own set of rules and guidelines for sending emails that are designed to prevent spamming from their email servers. This might not suit a business that has custom email requirements. For such requirements, you need to set up your own SMTP mail servers. If your needs are straightforward, you can opt for a simple SMTP server, which is a lightweight and basic option suitable for personal or small-scale use.
Introduction to Mail Servers
A mail server, often referred to as an SMTP server, is a specialized computer or software application responsible for handling the delivery and receipt of email messages. Using the Simple Mail Transfer Protocol (SMTP), mail servers send and receive emails across the internet, acting as the backbone of digital communication for businesses and individuals alike.
Setting up your own mail server gives you full control over your email services, making it a viable option for businesses with unique requirements or those seeking greater flexibility than what standard email service providers offer. With your own mail server, you can configure advanced features such as email authentication, encryption, and robust spam filtering to enhance data security and ensure reliable delivery.
Mail servers can be installed on a variety of operating systems, including Linux and Windows, allowing you to choose the environment that best fits your needs. The process involves configuring DNS settings to properly route your email traffic, selecting the right SMTP software, and associating your mail server with your chosen domain. Ensuring a stable internet connection is essential, as it allows your server to send and receive emails without interruption.
Data security should be a top priority when setting up your mail server. Implementing strong authentication methods and keeping your server software up to date will help protect your system from unauthorized access and potential threats. By taking these steps, you can create a secure, reliable, and fully customizable email solution tailored to your business or personal needs.
What Is an SMTP Server?
SMTP stands for Simple Mail Transfer Protocol, and it is the protocol used to send emails over the internet. Popular mail services like Gmail and Outlook use SMTP servers to deliver and receive emails.
Just as HTTP is used to deliver websites to users, SMTP is used to send emails and web servers that support SMTP are called SMTP servers. SMTP servers can also relay messages between different servers, ensuring reliable and scalable email delivery. You need an SMTP server to deliver emails from your domain name, and when you use an email service, you are using the SMTP servers from the service provider according to their stipulations.
Requirements for an SMTP Server
There are some requirements you need to satisfy before you can set up SMTP servers. More specifically, you’ll need to have the following before setting up SMTP servers:
- A virtual private server (VPS)
- Domain name
You can set up SMTP servers on your personal PC, but for formal applications it’s always recommended to use a VPS. You can choose any of the VPS options from IaaS (Infrastructure as a Service) service providers according to your requirements, but make sure the email ports are not blocked first.
You also need to have a domain name from which you’ll be sending emails. For this example, we will be using the domain ‘postscript.email’. Similarly, to set up your SMTP server, you need to have a domain name. You can buy a new domain from any domain registrar. If you have an existing domain name for your website, you can use the same domain name for your SMTP server.
SMTP servers can also be configured to manage multiple domains, allowing you to send and receive emails from different addresses.
SMTP Software
You’ll need to install SMTP software to support and run the SMTP server. There are two broad approaches you can take here. The answer to which SMTP software you should choose depends on factors like your scale, purpose, and technical preferences.
Install a Dedicated SMTP Server
The first option is to install dedicated software that just handles the SMTP server. This software will have no other capability other than managing the SMTP server, but some software will have additional facilities like managing mailing lists, spam filters, etc. This will depend on the SMTP software you use. Similarly, there are paid, free, and open-source SMTP software you can use.
Some of the most popular SMTP servers are:
Each of the servers will have its own dedicated installation instructions, as well as guides on how to manage and maintain the SMTP servers. For detailed documentation and support, be sure to follow the official link for each software.
Web Hosting Control Panel
According to Wikipedia, “A web hosting control panel is a web-based interface provided by a web hosting service that allows users to manage their servers and hosted services.” They install and manage all the nitty-gritties of managing web servers and only require minimal interaction. Such web hosting control panels have SMTP servers embedded in them, making this the easiest way to set up an SMTP server. Some of the most widely used web hosting control panels are:
- cPanel
- DirectAdmin
- phpMyAdmin
- Plesk
Using any of the above control panels gives easy access to creating SMTP servers. To send and receive emails you just have to make sure that the VPS has not blocked the email ports.
Setting Up an SMTP Server with Plesk
Plesk is a popular web hosting control panel. Here, in this example, we are using a privately hosted Linux server with Plesk installed. The domain registrar used is namecheap and the domain ‘postscript.email’ is already purchased with the registrar.
Once the DNS is resolved the domain name will point to the server whose IP address you gave.
It is important to create a backup of your configuration settings and email data at this stage to prevent data loss during setup.
DNS Records
First, you need to change the DNS records of the domain. For that, log in to the domain registrar and access the advanced DNS settings of the domain.
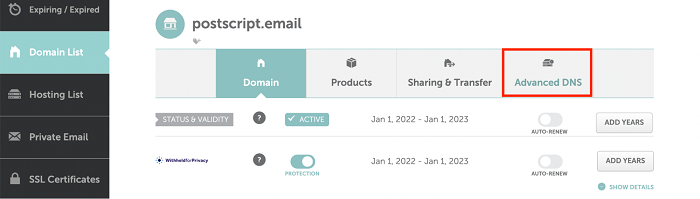
Change the DNS records for the domain
In namecheap, under ‘HOST RECORDS' click the ‘Add new record' button.
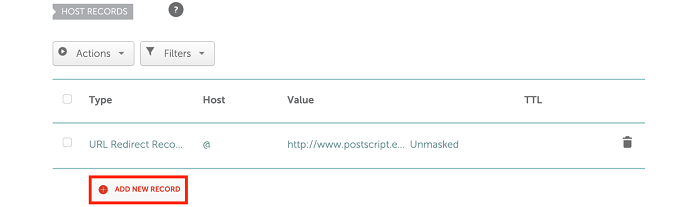
Click 'Add new record' in namecheap
Choose ‘A Record' as the record type, ‘@' as Host, and the IP address of your server as the value. Click on the ‘Save all changes' button to save the record. Once the DNS is resolved the domain name will point to the server whose IP address you gave.

Set options in namecheap
Adding the Domain to Plesk
The next step is to add the domain name to Plesk. Login to the Plesk server dashboard and click on the ‘Add domain’ button.
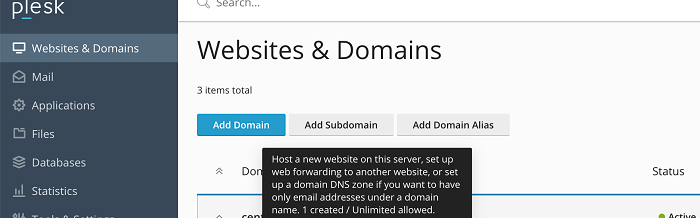
Login to the Plesk dashboard
Choose the appropriate way of creating your website in the following screen. If you just want to set up the SMTP server, you can go with the option ‘Blank website’. Enter the domain name, complete the other fields and click the ‘Add domain’ button.
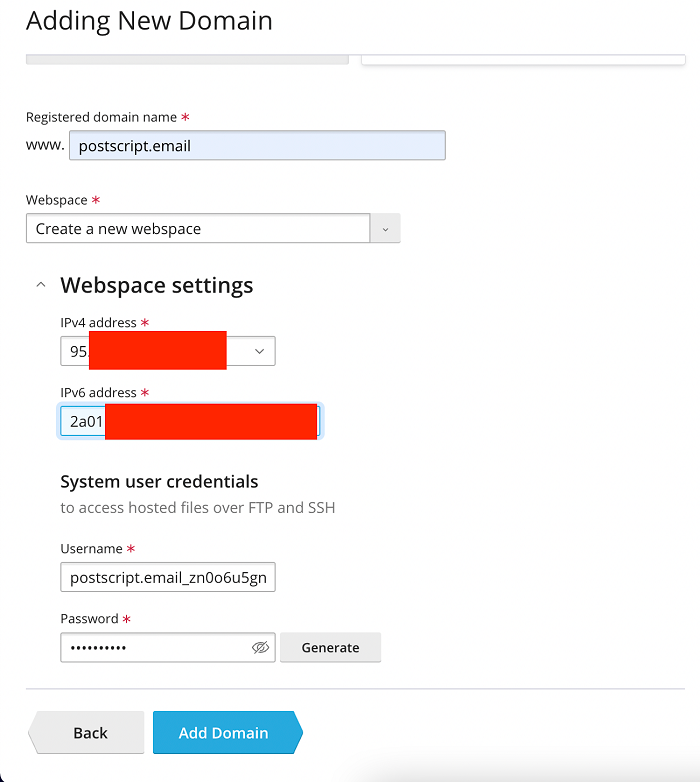
Adding the new domain in Plesk
Now the SMTP server is automatically created by Plesk for the domain. It is important to configure sender addresses and authenticate senders to maintain email deliverability and compliance.
Adding Email
Navigate to the webspace corresponding to your domain in the Plesk server and click on the tab titled ‘Mail’, then choose ‘Mail Accounts’.
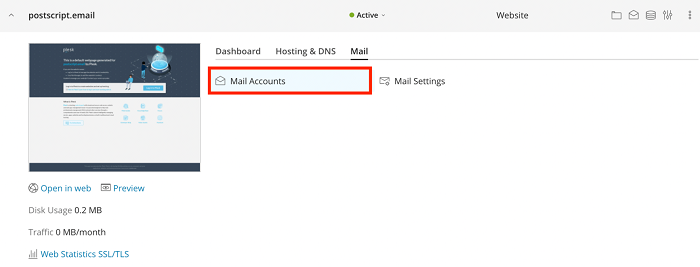
Click ‘Mail Accounts’ in Plesk
Click on the ‘create email address’ button on the following page. Enter the details, password, and other settings. Click on the ‘OK’ button. You can also choose to use an auto generated password.
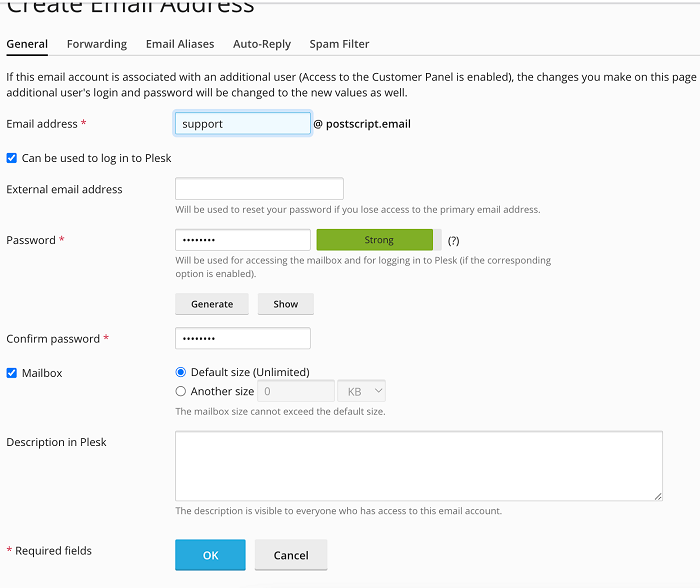
Update your email settings in Plesk
You can use the email address with the password to send and receive emails. In this example, the email created is ‘[email protected]’.
The conventional practice today is to use an email service to send emails from your domain name, but you have to adhere to the rules and regulations of the email service provider. One viable option, with more freedom, is to set up your own SMTP server with the appropriate software that suits your needs.
Email is just one of several ways to engage your users and send notifications about password changes, transactions, and other details. MagicBell’s complete notification system allows you to manage push, email, and in-app notifications from a single dashboard.
With MagicBell, you can launch a notification system in an hour, without breaking a sweat.
If you have any questions or need further clarification about adding email accounts in Plesk, please leave a comment below.
Troubleshooting Common SMTP Mail Issues
Even with a well-configured SMTP server, you may encounter common issues that can disrupt your email services. Problems such as blocked ports, incorrect DNS settings, and authentication errors are frequent obstacles when managing mail servers. You can test your SMTP using our dedicated MagicBell testing suite.
To troubleshoot these issues, start by reviewing your SMTP server logs for any error messages or unusual activity. These logs often provide valuable details that can help pinpoint the source of the problem. Next, verify your DNS settings to ensure that your domain is correctly configured to route emails through your SMTP server.
It’s also important to check that your SMTP server is set to use the correct port—typically port 25 for standard SMTP traffic. Sometimes, internet service providers (ISPs) or firewalls may block this port, preventing your server from sending or receiving emails. If you suspect a port is blocked, consult your ISP or adjust your firewall settings accordingly.
Authentication errors can occur if your email client is not using the correct SMTP server address, username, or password. Double-check these details in your client’s configuration and ensure that SMTP authentication (SMTP AUTH) is enabled if required by your server.
If you continue to experience issues, consider reaching out to your email service provider or consulting with a professional IT specialist. Regularly monitoring your SMTP server and email client logs, as well as keeping your SMTP software and operating system updated, will help prevent many common problems and maintain the security of your email server.
Conclusion and Next Steps for Your SMTP Server Setup
Setting up your own SMTP server gives you full control over your email services, allowing you to customize settings, manage email accounts, and send and receive emails using your own domain. With the right SMTP software and a properly configured operating system, you can take advantage of advanced features such as email authentication, encryption, and spam filtering to enhance both security and reliability.
To keep your SMTP server running smoothly, make it a habit to monitor server logs, update your SMTP software and operating system regularly, and implement additional security measures like SSL encryption. These steps will help protect your email server and users from potential threats and ensure consistent delivery of your messages.
If you encounter any challenges during your email server setup, refer to the troubleshooting section above or seek assistance from a professional IT specialist. By following best practices for email server management, you can enjoy the benefits of a secure, reliable, and fully customizable email system tailored to your needs.
With your own SMTP server in place, you’ll have the flexibility to manage your email services exactly as you want, supporting your business communications and user notifications with confidence and control.