
A webhook is an HTTP callback that delivers real-time data from one application to another the moment a specific event occurs, eliminating the need for continuous polling. In this webhook tutorial you will learn how webhooks work, see how they compare with traditional APIs, and walk through practical webhook examples — including a code snippet for building your own webhook receiver.
An application needs to communicate with other applications, servers, and users. Application programming interfaces (APIs) are commonly used for such purposes, but APIs are two-way communication systems that require more computing resources to maintain. Webhooks provide a simpler and less resource-intensive alternative. Think of it like a sports score alert: instead of refreshing a website every few minutes to check on home runs, you set up a webhook so the live score provider pushes an HTTP request to your mail server whenever the score changes — no polling required.
Definition of Webhooks
Webhooks deliver messages to webhook endpoints on different applications. Messages are sent using HTTP protocol, and the communication is only in one direction. When two different applications have to work together, one of them will have to perform an action based on an event happening in the other application.
In the scenario given above, hitting a home run is the event. The change in the number of home runs in the database triggers an HTTP request to the mail server, which in turn sends an email. Multiple applications were able to relay information based on an event. The applications did not have to monitor constantly to check whether the event occurred.
With webhooks, the communication happens only in one direction and cannot be sent in the opposite direction. To send messages in both directions between two apps, APIs have to be used.
Webhooks vs. APIs
Due to the nature of webhooks, they are also called lightweight APIs. They are also sometimes referred to as reverse APIs. However, webhooks and APIs have many differences between them in spite of some similarities. Let’s take a look at some of the most important ways webhooks differ from APIs.
Webhook CRUD Limitations
APIs can be used to create, read, update and delete data from the API provider. Webhooks cannot manipulate data — they can only be used to read information pushed by an event.
Webhooks Push vs. API Pull
Actions performed with APIs require active effort from the user, and specific instruction has to be passed with the API. This is a pull operation. Webhooks, by contrast, trigger messages automatically when an event occurs — a push operation.
Webhook Events vs. API Requests
APIs are request-based: the application or user that needs information must send a request to the respective server. Webhooks are event-based. When an event occurs, a message is pushed out to the recipient via HTTP.
Webhook Resource Efficiency
Implementing an API requires more bandwidth and computing power to receive, process, and respond to calls. To keep tabs on status changes with APIs, requests have to be sent constantly. Webhooks require relatively few resources because HTTP messages are triggered only when the defined event occurs.
Webhook One-Way Communication
APIs support two-way communication, meaning that two services connected with an API can talk to each other. Webhooks only allow for one-way communication. The messages originate from the service where the events occur and are delivered to the receiving service.
Webhook Data Volume Constraints
Webhooks are typically used when the volume of data to be transmitted is small. They are generally not designed for large data payloads. APIs don’t have such limitations; their capacity is determined by the API provider’s infrastructure.
Webhooks for Real-Time Data
When data is required in real-time, webhooks are a better solution because messages are pushed out immediately. APIs aren’t as useful for real-time information dissemination, because API calls have to be made regularly — resulting in wasted resources and bandwidth.
How to Use Webhooks
Now that you understand how a webhook compares with an API, the next step in this tutorial is learning how to wire one up. Two applications can communicate with the help of a webhook. To make it possible, one of the applications has to accept a URL to send messages and the other application should be configured to receive the message. The messages have to be sent by the trigger application to the other application (action application) when triggered by an event.
The messages sent with a webhook are called requests, which are sent with HTTP protocol. Every webhook request has a well-defined structure with four distinct parts:
- URL: The webhook URL tells the sender where to deliver the payload. The user should pass a URL from where they can access information.
- Body: The information to be sent is the body of the request, which is called the payload. The body can be sent in JSON or XML format instead of HTTP.
- Header: The header specifies how the information in the payload is formatted. It provides context to the data.
- Request method: The request method is the action to be taken by the application that receives the message. The HTTP methods used are GET, POST, PUT, and DELETE.
When the configured event is triggered, the trigger application sends the webhook payload to the action application. Based on this, the action application performs the specified task. The action application also needs to send back an HTTP status code as an acknowledgement. 200 is the HTTP code used to indicate the successful receipt of data, and 4xx or 5xx codes signal an error.
Take the home runs example we discussed previously. An email has to be sent when a home run is hit in the game. You can create a webhook with an application that provides live scores. As an example, say the URL of the application is baseball.com. The application is configured to send messages to your mail server. Let’s assume your URL to be yourapp.com.
In this example, the trigger application is baseball.com and the action application is yourapp.com. The event that triggers the webhook is a home run occurring in the game. The URL added to the webhook is https://yourapp.com/home-run-tracker/. When a home run occurs in the game, baseball.com sends a message to yourapp.com with the following URL:
https://yourapp.com/home-run-tracker/?NewHomeRun=1&HomeRunTeam=RedSox&TotalHomeRun=7&RedSoxHomeRun=4&YankeesHomeRun=3
The message contains the following information:
NewHomeRun=1     // A new home run is hit
HomeRunTeam=RedSox      // Team that hit the latest home run is Boston Red Sox
TotalHomeRun=7     // Total number of home runs in the game is seven
RedSoxHomeRun=4    // Total number of home runs hit by Boston Red Sox is four.
YankeesHomeRun=3     // Total number of home runs hit by New York Yankees is three.
When this message reaches the action application, it has to send a premade email to your work email address. The email can be a template and can be filled with the information received from the trigger application through webhooks. To see this in practice, test your webhook implementation with a free online tester that captures and displays requests in real time.
Webhook Receiver Code Example
Below is a minimal webhook receiver written in Node.js with Express. This endpoint listens for incoming webhook POST requests, verifies a shared secret, and processes the event payload.
const express = require('express');
const app = express();
app.use(express.json());

const WEBHOOK_SECRET = process.env.WEBHOOK_SECRET;

app.post('/webhooks', (req, res) => {
  // Verify the webhook signature
  const signature = req.headers['x-webhook-signature'];
  if (signature !== WEBHOOK_SECRET) {
    return res.status(401).json({ error: 'Invalid signature' });
  }

  const event = req.body;
  console.log(`Received webhook event: ${event.type}`);

  // Handle different event types
  switch (event.type) {
    case 'order.completed':
      // Process the completed order
      console.log('Order completed:', event.data.order_id);
      break;
    case 'payment.failed':
      // Handle failed payment
      console.log('Payment failed:', event.data.payment_id);
      break;
    default:
      console.log('Unhandled event type:', event.type);
  }

  // Always respond with 200 to acknowledge receipt
  res.status(200).json({ received: true });
});

app.listen(3000, () => console.log('Webhook receiver listening on port 3000'));
This webhook tutorial example shows the three essentials every receiver needs: signature verification, event routing, and a quick 200 response so the sender knows the webhook was delivered.
Webhooks Examples
Webhooks are very commonly used in modern applications. In this section, we’ll review a couple of examples of webhook implementation.
Google Sheets Webhook Tutorial
Google Sheets has a webhook integration that can be used by anyone without much coding experience. This is a webhook example in which a Google Sheet triggers emails based on stock price events. The webhook implementation with Google Sheets is abstracted away from the end user, making it a great starting point for this tutorial.
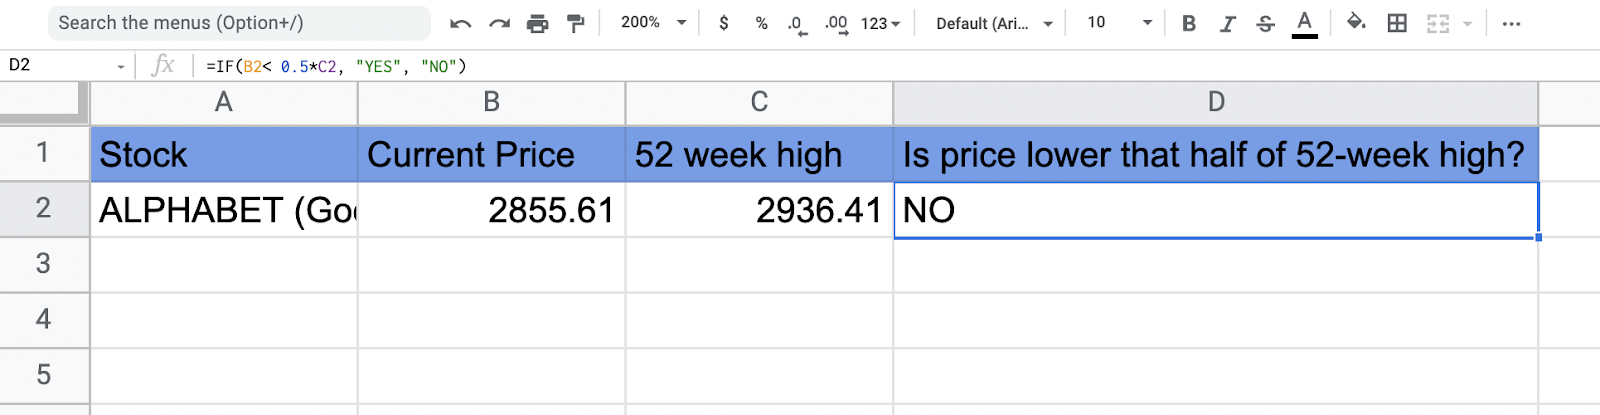
Let’s say we want to track the share price movement of Alphabet, the parent company of Google. First, you’d create a Google Sheet as shown in the image below:
Create a Google Sheet
The current price of Alphabet stock can be obtained by the following function:
=GOOGLEFINANCE(“GOOG”)
The 52-week high of the share price can be obtained with the function:
=GOOGLEFINANCE(“GOOG”, “High52”)
The final column is a conditional statement with IF. The statement IF(B2< 0.5*C2, “YES”, “NO”) checks whether the share price of Alphabet has fallen to below half of the 52-week high.
Then select Tools > Script Editor from the Google Sheets menu.
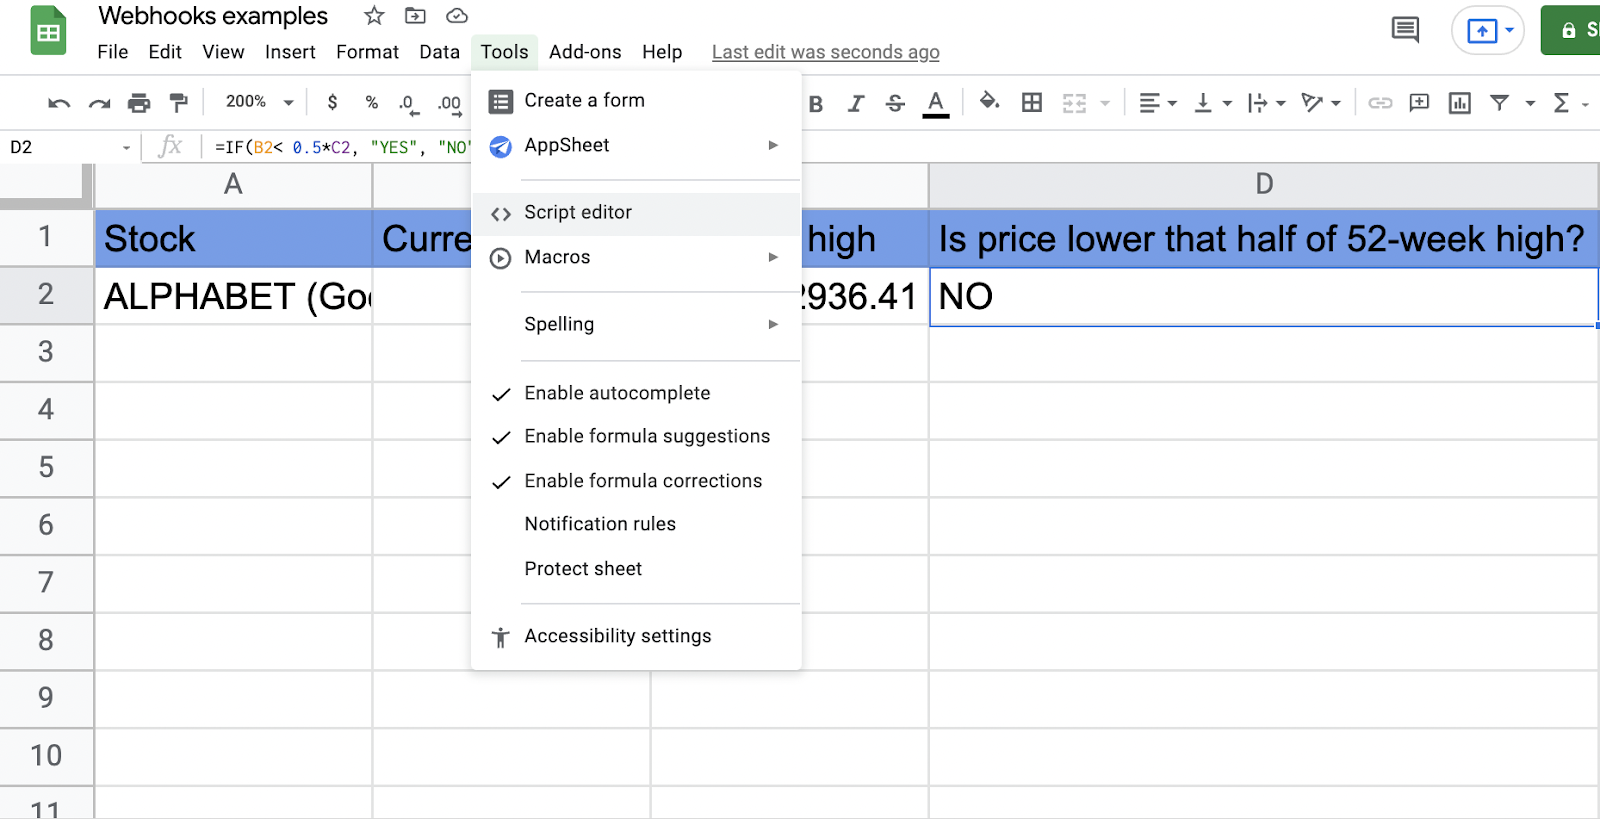
Select Tools > Script Editor
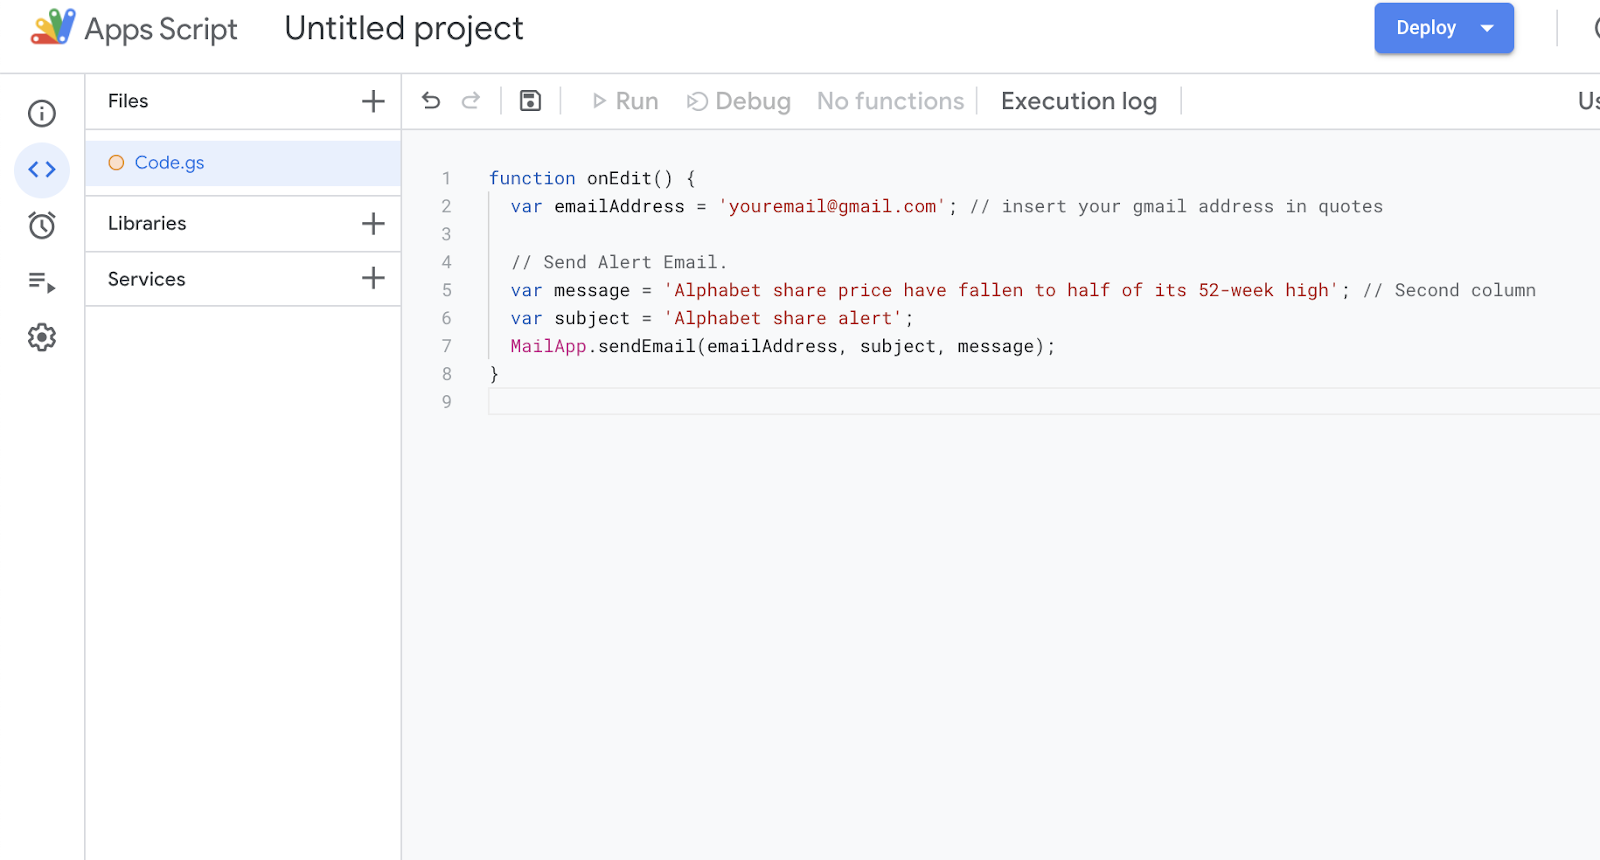
This brings up a window where custom scripts can be written. Paste the script given below:
function onEdit() {
  var emailAddress = '[email protected]'; // insert your gmail id here
  // Send Alert Email.
  var message = 'Alphabet share price have fallen to half of its 52-week high'; // Second column
  var subject = 'Alphabet share alert';
  MailApp.sendEmail(emailAddress, subject, message);
}
Paste the script into the Script Editor
This function sends an email to your desired email ID with the subject and message as given in the code snippet. Save the script with the save button at the top of the window. This is the action side of the webhook tutorial — the script that runs when the event fires. Next, click on the button with the clock logo on the left-hand side of the window.
In the window that pops up, click on the “Add Trigger” button at the bottom right-hand side of the screen. The following pop up window appears:

Click "Add Trigger"
In the first field, you’ll choose which function to run. It’s the onEdit function in the code snippet saved in the script editor. Choose “Head” for the deployment and “From Spreadsheet” as the event source. The event type is onEdit. Then hit “Save.” This triggers permission requests from Google. Grant the permissions to complete the webhook setup.
When the share price actually falls below half the 52-week high of the stock, cell D2 of the spreadsheet changes from “NO” to “YES.” This becomes an edit in the spreadsheet. This event triggers the function saved in the script editor to send an email to the email address given. The recipient receives an email that looks like this:
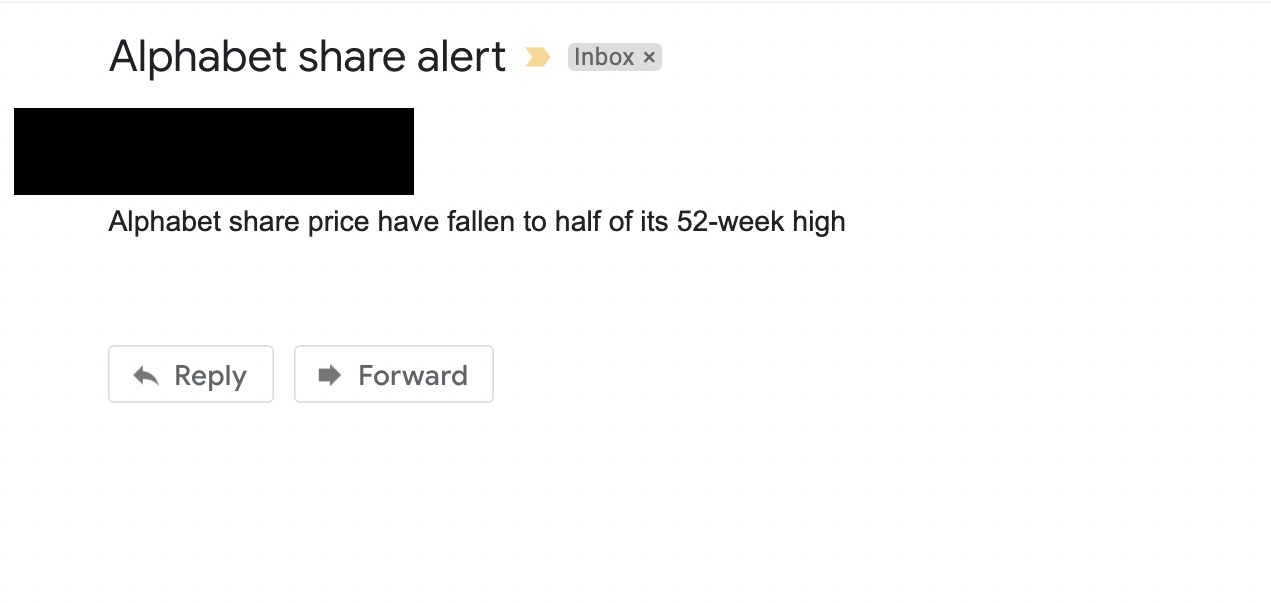
The recipient receives the above email
By using webhooks, you do not have to keep tracking the share price of the stock. When the event occurs, you’ll be alerted by email. If the Google Finance API had to be used instead of setting up a webhook like this, regular queries to the API would need to be sent to keep track of the share price. This simple webhook connecting Google Sheets to send emails can be used for different use cases.
Other Real-World Examples of Webhooks in Practice
E-commerce websites send regular emails while users are transacting with the site. Adding a product to their shopping cart, making a purchase, product movement with the logistics provider, etc. are all considered events. These events can trigger emails to the user. This can be accomplished by a webhook integration with the e-commerce platform and a transactional email provider. This automatically sends the appropriate transactional emails according to the events triggered. Payment processors like Stripe send webhook events for failed payments and subscription renewals — see Stripe notification workflows for more examples.
One of the common two-factor authentication techniques used is a code provided as an SMS message. When a user tries to log in to a website by entering the login credential, it's an event. This event triggers sending an SMS message to the user. This can be implemented by a webhook with the platform and a messaging service like Twilio. The action of sending the code is automated and happens based on a trigger event, which is the user entering the correct login credentials for the website.
Similarly, SMS messages and emails are sent for bank transactions. This can be implemented using webhooks. While you can also use email APIs to send transactional emails in this case, almost all transactional messaging can be implemented using webhooks.
One of the most popular webhooks integrations is with GitHub. When a code change is pushed to the GitHub repository, it can be used as an event to send notification messages to communication applications like Discord or Slack. This can be used to notify the developers to inspect and merge code. GitHub webhooks support 73+ events covering pull requests, issues, security alerts, and deployments. MagicBell provides pre-built GitHub notification workflows that trigger on events like pull requests and CI/CD pipeline completions.
Webhook Event-Driven Automation
Many processes in software are dependent on other processes and events.
Using APIs to listen to events and accomplish an action is costly and consumes significant computing resources. A webhook is a lightweight solution for performing event-driven tasks.
Webhooks are increasingly being used in modern application development, and more applications are adopting webhook support as a feature. This will help to simplify app-to-app communication and enable event-driven software process automation. If your customers want to receive webhooks, take a look at the top open source webhook management services to integrate into your product.
Notifications can take several forms, but they’re increasingly important in the modern world, as users rely on a growing number of websites and applications for many day-to-day tasks. Whether you wire up a webhook or use an API, MagicBell’s complete notification system allows you to centralize and sync notifications, ensuring that users never miss important updates while also ensuring that you don’t notify users twice on different platforms. Now that you have finished this webhook tutorial, try it yourself.